Showing posts with label 4th of july. Show all posts

Saturday, July 2, 2011

4th of July Craft: Patriotic Candle Holders

This is a really pretty craft that I love to do. It's simple, but always looks like stained glass, and like it took a lot of effort. You can modify it for anytime of the year and any decor, but we decided to do it with red, blue, and light blue to make it for the Fourth of July. All you need is a tea light candle or another candle that will fit, and it'll be really pretty.


This is one I made because the ones the kids made actually got knocked over and broke... Yes, it is a fragile craft because it is glass, so please, be careful with it!!

What You'll Need:

  • Glass baby food jar without the lid (not the newer plastic ones, but the old fashioned ones). If you can't find an old baby food jar, you can probably do it with another kind of jar as long as the glass isn't too thick
  • Tissue paper, cut into squares. For the patriotic theme, we used red, blue, and light blue that looks almost like white
  • Glue
  • Water
  • Bowl (this is to hold the glue mixture so it can be any kind of container, really)
  • Medium to small paintbrush (not one you use to paint your walls)
  • Tray or newspaper to hold the craft
How to Make It:
  1. Set out your tray or newspaper first because this craft will get a little bit messy.
  2. Mix the glue and water in the container using the paintbrush. You'll probably need about twice to three times as much water as glue. The mixture needs to be very wet and drippy, more of a water consistency than a gluey consistency.
  3. If you haven't already, cut small squares out of the red and blue and white (or whatever colors you chose) tissue paper. They should be about 1 square inch to 3 square inches because the jar is small. If you have a larger jar, you can use larger squares of tissue paper.
  4. Paint the jar over with the glue mixture. It's going to get messy quickly. You can't hold it while painting it, or you'll get your hands covered, so go ahead and put it on the tray and allow the glue to spread over the entire outside of the jar. (Depending on your child's age, he or she can do this step.)
  5. Now your child can press the squares of tissue paper onto the wet glue-covered jar. They should cover the entire jar, and can overlap the pieces for more vivid colors.
  6. Paint over the pieces of tissue paper with the glue mixture very gently. If you put too much on one piece, move the brush too fast, or press too hard, you might rip the papers, so be careful. Make sure to cover all of the papers on the jar with the glue mixture. You'll see it start to resemble stained glass.
  7. Let the candle holder dry for a while, being careful not to touch it or knock it over. Once it dries, you can use it.
 With the tea light candle inside, top view. It's on a tray on a table. But that's the finished project. I love it :)

Thursday, June 30, 2011

4th of July Craft: Red, White, and Blue Pinwheels

I didn't get the opportunity to post yesterday because we had extra kids in the classroom, so we just made the fireworks pictures. But today, we did something different since we had only a few kids. These are pinwheels. Of course, the picture is of a sample one I colored before we did them for the 4th of July, so the picture isn't red, white, and blue. But most of these crafts are interchangeable between holidays and across some themes. Or you can simply do them for any day.

Here's the finished product, colored with various different crayon colors.

What You'll Need:
  • Piece of normal white printer paper, cut into a perfect square. The size of the square would depend on what you'll be using for the stick, but it'll need to be at least 6 in. x 6 in.
  • Single hole punch 
  • Thick craft stick, pencil, or straw for stick on pinwheel
  • Tack
  • Hammer (if using craft stick or pencil)
  • Brad (if using craft stick or straw)
  • Crayons, markers, stickers, etc. to decorate
  • Scissors
By the way, these are brads, in case you didn't know.


How to Make It:
  1. If you haven't already, cut the square out of the normal printer paper, approximately 6 in. x 6 in. Cut into each corner of the square about 2/3 of the way into the center. Punch a hole on the left side of each cut in the corners.
  2. Have the child color and add stickers (flat ones, not foam ones. Otherwise, they'll come off), and avoid gluing anything on that could fall off in wind.
  3. After it's colored and done, pull the corners back and line all of the holes up behind the center of the square so that it forms the pinwheel shape (don't actually fold it, leave the edges rounded so you have cups as the edges). If you're using the pencil, hammer the tack into the center of the square and the top 1/2 inch of the pencil (doesn't matter which end you use, but the metal end is probably harder to hammer through). If you're using the craft stick, hammer the tack into the center of the square and the top 1/2 inch of the craft stick gently a few times to form a large enough hole for the brad to fit through. Pull the tack out and replace it with the brad, fastening it in the back when you get it all the way through and tight enough. If you're using the straw, follow the same instructions as the straw, except you probably won't need to use the hammer. Make sure that the pinwheel isn't too tight, otherwise it won't spin.
  4. Now, blow air into the small triangular cups formed by the edges of the pinwheel, and watch it spin!

Tuesday, June 28, 2011

4th of July Craft: Star of the Parade Wands

This is a quick and easy craft when your child wants to make his or her own toys. Also, it's good for children to learn sizes and the star shape.

These wands were actually made by two of the 2 year olds in my summer camp class!!

What You'll Need:  
  • Red and blue construction paper
  • Red, blue, or white ribbon
  • Star foamies, star foam stickers, or star stickers
  • Dowel, about a foot long and 1/8th inch thick
  • Glue
  • Scotch tape 
How to Make It:
  1. Cut the stars out of the red and blue construction paper. The red star will need to be bigger than the blue. As a judge for the size we used, you should only be able to cut two red stars out of a sheet of construction paper (you will have extra scraps, but they should be pretty big). The blue stars should be able to cut about four out of one sheet of construction paper, but I free-handed the blue stars, so I don't have an accurate size. If your child is old enough, he or she can cut out the stars and judge the sizes on his or her own, after you tell him or her that the blue star needs to be smaller than the red one.
  2. Cut a long piece of ribbon, about twice as long as the dowel, and tie the middle of it around the dowel in a double knot at least an inch and a half from the top of the dowel, allowing the ends of the ribbon to hang down. You can adjust the size and trim the loose ends if you feel they're too long.
  3. Tape the red star to the dowel by spreading a piece of clear Scotch tape across the dowel, the edges of the piece of tape pressing onto the red star. The red star will be the back of the wand, with the dowel in the middle.
  4. Have the child either glue the stars on the blue star, or put the stickers on. They can do one in the center, or spread several all around the star. Since we only had a few kids in class today, we let them put as many as they wanted on.
  5. Spread glue liberally on the back of the blue star, and press onto the dowel and red star, sandwiching the dowel between the red and blue stars.
  6. Allow the wand to dry and it's done. If you want, you can add glitter, more stickers, or anything else you want. Also, you can add maybe one or two more star layers with white paper and/or aluminum foil. You can recycle the leftover red, blue, and whatever other paper or foil you choose to use by cutting the smallest stars out of them, as well. 

Monday, June 27, 2011

4th of July Craft: Exploding Fireworks Picture

This is just a simple picture that any age can do, with supervision for the younger ones, of course. But it's easy, fun, and always comes out looking really cute.

What You'll Need:
  • Black construction paper (you can cut one sheet in half, if you want to save paper, or if you have multiple kids working on the project)
  • Newspaper, a tray, or something to put underneath to prevent paint and glitter to go everywhere
  • White, blue, and/or red acrylic paint
  • Silver, blue, and/or red glitter
  • White chalk (optional)
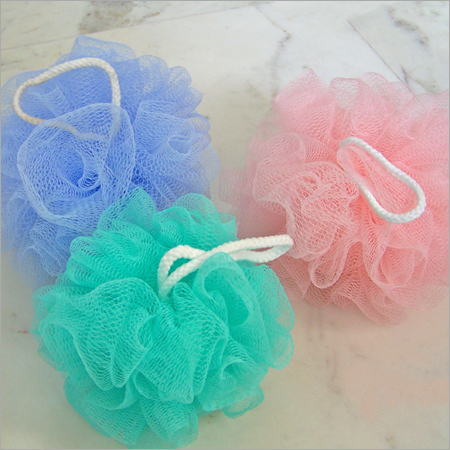
  • Old body loofah, sponge, or even the child's hands
These are the body loofahs. They're only one option usually found in households for you to use.

What to Do:
  1. If you want, cut a sheet of black construction paper in half. This step doesn't need to be done, but can be if you're working with multiple children on this project and don't want to waste any paper.
  2. Set out the newspaper, tray, or whatever you choose to use to collect the excess paint and glitter.
  3. Set out the white, blue, and/or red paint in separate dishes. For the sample picture, I used all three colors. It's easy to use something like a paper or plastic plate, or a shallow dish so the sponge or loofah can get more paint on it.
  4. Have the child dip the loofah, sponge, or his hand in the paint and press it to the paper a few times to make the exploding fireworks.
  5. Wash the child's hand or hands immediately so they can apply the glitter. If your child is young, you can help him or her shake the glitter onto the wet paint so it sticks. Set aside to dry.
  6. Once the paint and picture is dry, you or your child can draw the lines to make it look like the fireworks are rising up into the sky and exploding. You or your child, depending on age, can also write "Fireworks" or his or her name on the bottom. And voila! A simple, cute fireworks picture!